
Saturday, 30 November 2013
Monkey Visual Development Drawings
Face concept thumbs.


Side & back view head thumbs.

How will the feet move? how many toes does this monkey have? 3 and a thumb? we almost wish to create hands out of the feet, as monkeys carry this feature in order to move as they do. Seeing as this is a stylised impression of a monkey, we were not afraid of implementing different cross species of monkeys into one design that we felt was our character. We didn't wish to feel tied down by a sense of reality.


Shape grammar Thumbs, trying to get a grasp on the nature of the character. Is he short? tall? mean? funny? goofy? Is he flexible? or can he be used moderately to just perform as necessary within the film? What is his personality?

I settled on the 2nd top left version of the monkey, as I feel the drawing has the ability to maintain the animalistic look, combining this with a human look, to carry the weight of relation and appeal to the audience. I feel as though when it comes to physically animating the rig, the character will be able to move to the demands of the story and what we require the monkey to do within the film, and the way he interacts with the other character and the environment as a whole. I wanted an animal that would be able to move flexibly, and with ease. Not a character with a massive weight issue, because it would practically slow down the pace of the film. I wanted the character to move with that rhythm - the high level pace - and I feel as though this character, with a skinny body mass would help the character to meet this demand.
I wanted to implement a cheeky-ness to him. I wanted him to also have personality. It's my desire to make sure he cares about his counterpart, and therefore carries a sense of obedience, but also a sense of recklessness and an erratic that he tries to maintain. A tied up loose cannon. But more so, for the entertainment value of the film. A monkey robbing a bank? it's goofy, and it sounds fun. That's what we want!

Wednesday, 27 November 2013
Play blast of the Opening Scene - Camera Set Up & Layout Blocked in.


Light turns to red...

AND VROOOOOOOOOOOOM!!!!!!
Wide Shot

Into Close-Up

Monday, 25 November 2013
'Normal Map' Testing for exterior scene Brickwork

Original Design

Normal Map

Specularity Normal Map
Combine these to produce a result like the below.
First a test sequence on 3 3-dimensional shapes in Crazy Bump's preview mode -

Column

Sphere

Block
Then after this stage, and I am happy with my initial result, I export the maps I have created, and then fire up Maya, model a Polygon Plane and apply the normal map and original image (for colour) with help aligning the textures with the UV Texture editor. I found for this test, working from a Blinn material due to it's specularity produce, that I might get a really nice wet look, seen as it's just rained outside in my scene before the movie begins, it just appears to work well against the darker areas and crevices in the pattern work.

Ultimately, this is as far as I can take this render, because I have worked from the top image, and UV mapped that on top of the Normal map stuff, but for the final film, it will definitely be spiced up with some colour. Ultimately, this image makes a more clunky looking visual, that could be tidier, and the cement between the bricks could be a little more 'Americanised' and thinner, and after consulting with Mikey on the subject and producing the attempt with the Displacement map below, i'd say we achieved just the right balance of what I was looking for initially.

Attempt with a Displacement Map with a Bump depth of 0.150
Sunday, 24 November 2013
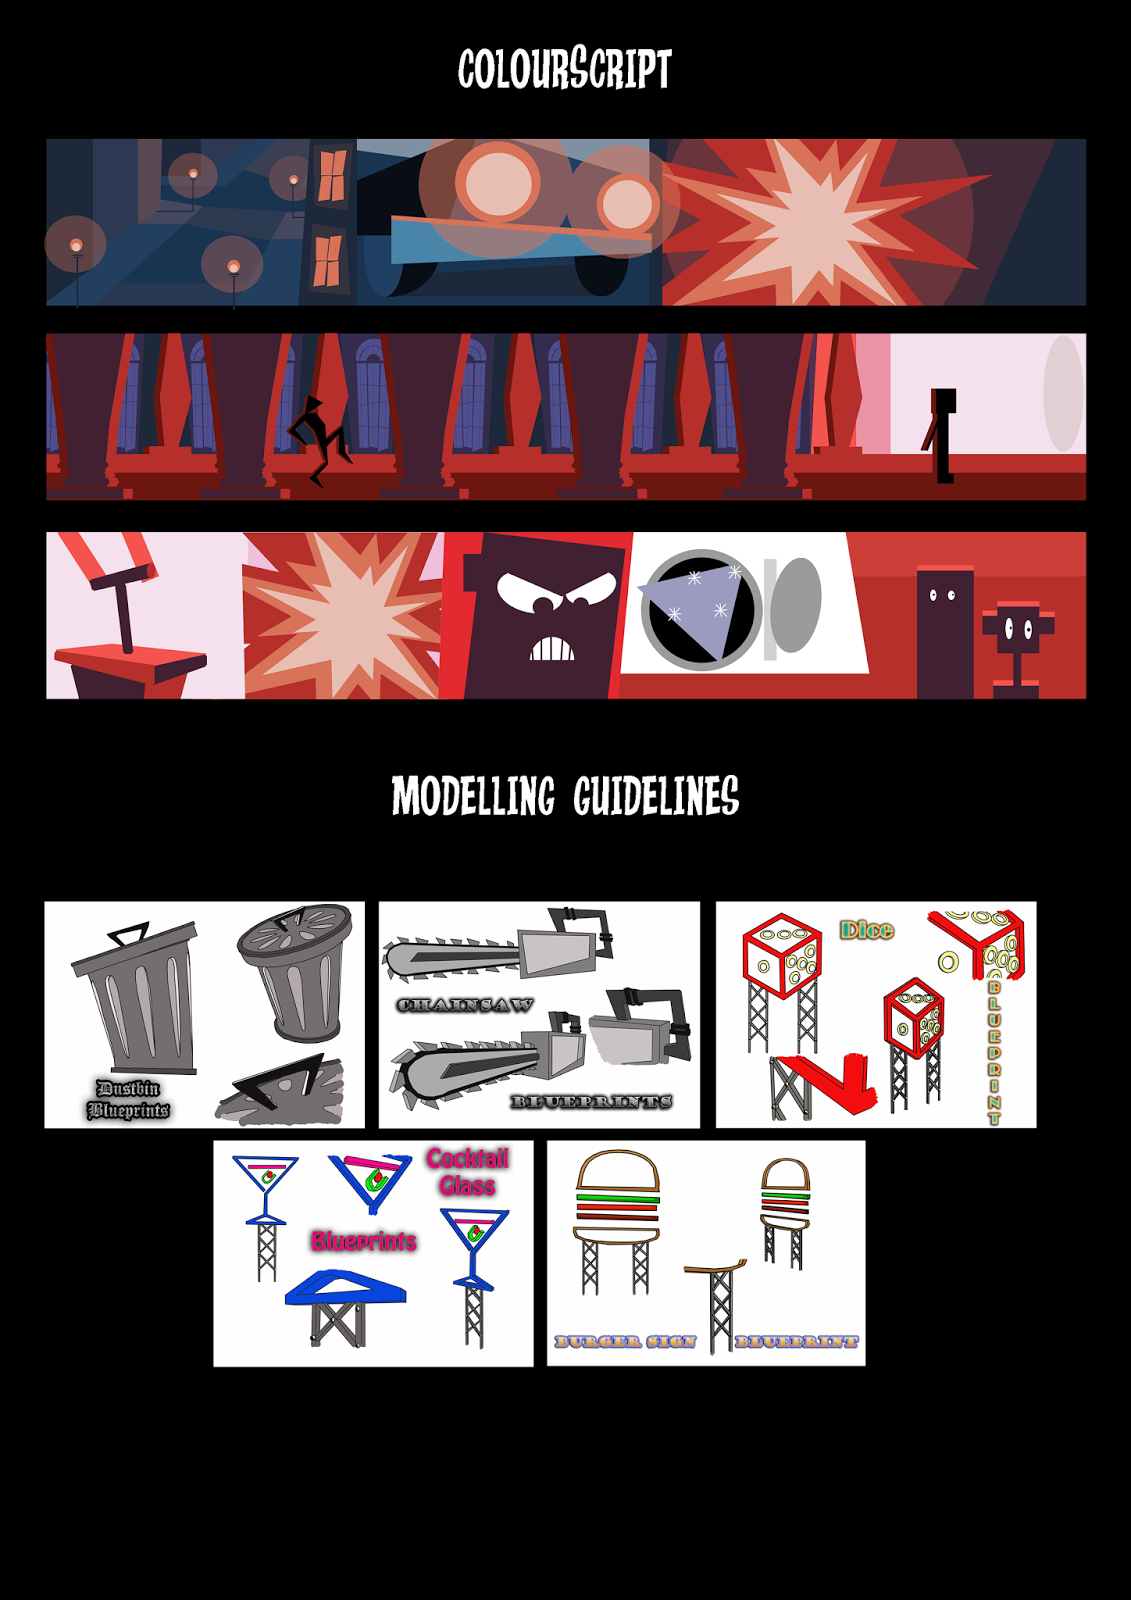
Shot-Build-Up Tutorial Video reference (Important for Modellers and Compositors!!)
Whilst the 15 second demonstration video is small due to upload restrictions, I hope it will help give a level of reference for the Crew. It simply demonstrates for the first shot, how Matte backdrop plates will be used alongside 3D models to build up the environments - and how this process will be used throughout the film to help build a better film - mainly so we know which assets need to be modelled and which do not.
Friday, 22 November 2013


Monday, 18 November 2013
Explosion Test
So seen as a lot of things blow up in this movie, it was important that I began practicing with 3D Container fluids in Maya and how a weighty film camera might interact at the point of an explosion.
BELOW...MORE CINEMATIC!
MORE ADVANCEMENT
Tutorial followed from Digital Tutors
So seen as a lot of things blow up in this movie, it was important that I began practicing with 3D Container fluids in Maya and how a weighty film camera might interact at the point of an explosion - with Shake, and bearing in mind how much it will shake depending on the mass/force of the explosion.
I began to follow the steps from the tutorial below, before tweaking little things by myself.
http://cg.tutsplus.com/tutorials/autodesk-maya/create-a-realistic-explosion-in-maya-using-maya-fluids/
Sunday, 17 November 2013
Concept Art & Layout Drawings


Clunky, 3x3 sidewalk tiles, all ever so slightly differently set to the other.
AND ONCE WE FINALLY GET DOWN THAT ROAD LEADING DOWNTOWN...WE ARRIVE HERE! THE BANK!!!


Subscribe to:
Comments (Atom)